Showing posts with label trainer. Show all posts

Wednesday, 30 September 2015

Review: Zwift

Last week the realization kicked in -- the days are getting shorter and so are my week night rides.  While I've ridden in the dark before, unless it's during a low traffic period, I try to avoid riding on county roads in the dark.  So I figured it would be a good time to start going over some indoor options.  The first of these I tried out was Zwift.


So what is Zwift?  In a nutshell, think World of Warcraft meets cycling.  Your bike is on a trainer, hooked up to a computer.  You ride your bike, and on the screen you are riding in a virtual world with many other people.  Sound simple?

Zwift Requirements
  • A computer from the last few years.  Can be a Windows PC or a Mac.  If it's a desktop you might be able to beef up an older system with a new video card.
  • ANT+ Connectivity.  For most people this means buying an ANT+ USB2 stick.  Most will work (except the older Garmin USB1 stick).
  • A way to get power, using one of the following:
    • A supported smart trainer.
    • A power meter.
    • An ANT+ speed/cadence sensor coupled with a supported "dumb" trainer. 
  • A heart rate monitor is not a requirement but it is definitely nice to have!

For my testing rig I used both a Windows laptop and a Windows desktop.  I had a Suunto Movestick Mini for ANT+ USB.  I have a Wahoo SC (supports dual bluetooth & ANT+) coupled with a Kurt Kinetic Rock'n'Roll trainer (supported by Zwift).  I also have a Wahoo TICKR heart rate monitor that I pair. I've been using my titanium road bike (aka the Titan) equipped with a blue Tacx trainer tire. Last but not least a 42" plasma TV and a TV dinner tray to hold my mouse, keyboard and other amenities.

Setting Up
In order to get up and running, first you will need an account.  After answering the usual questions (name, email, password), Zwift gets a little personal.  Some of this info is needed to put together your avatar correctly (gender, height) and it factors your weight in the game.  Don't worry, it's not going to make your avatar obese... mine definitely doesn't have the kegger that my body does in real life!  Last but not least, it asks you metric or imperial so it knows what you want information displayed in.  I always get so torn here; I prefer my distance in kilometers and my weight in pounds.

The next screen you see brings you into a pairing configuration.  This is where you set up your gear.  This was pretty painless to do.  If you are trying this out and can't see your gadget, remember many of them need to be "woken" up.  For a speed sensor, simply passing the magnet over the sensor will do.

Once you wake them up, you are able to search for them.  You only have to search for them the first time time; the next time around it will see them the moment they wake up.  After connecting my heart rate monitor, I connected my speed/cadence sensor.  Because I was using a speed/cadence sensor my next step was to select a trainer.  I quickly found the "Kurt Kinetic" setting and I was ready to go!

One last thing before hitting the course.... a challenge!  Currently Zwift has two long-term challenges.  You can choose either "Climb Mt Everest" for a total of 8848m of elevation or "Ride California" for a total distance of 1283km.  These are distances that are cumulative over all your rides.  In addition to a profound sense of accomplishment, there is also the promise of in-game swag

I've always had a fondness for long distance riding so I went with the California challenge.

Next I was asked if I wanted to just ride or if I wanted to start next to someone.  If you are looking to meet up with a friend this is handy.  But in this case I just wanted to try the whole course, so I selected "Just Ride."

Riding in Zwift

So at this point I appear in the game, at the side of a road.  I hop on my bike and start spinning.  My virtual self starts to mirror my movement and away we go.  Sure enough, I found my speed higher when going uphills and slower when going downhills.


 As you can see from the screen shot, there are a few display components.  Here is a rundown of each:
  • Upper left has a blue box.  This has your wattage in large white font.  Below is your current cadence and heart rate.
  • Between the blue box and white box is a faint circle.  When you have a power-up, this is where it is displayed.
  • The white box contains some other details.  First is your in-game speed, which takes into account the slope you are on and your weight.  Next is the total number of kilometers ridden this session.  Following this is an indicator of how high you've climbed.  Then the duration of your current session.  Below is a bar showing your points to your next unlockable item.
  • On the upper right are two profiles.  One is for your vicinity; it shows the grade of the slope, nearby riders and any nearby finish lines.  The one below is a profile of the entire course, showing you where you are, other riders, sprints, climbs and the lap finish.
  • Taking up most of the right side of the screen, is the riders near you.  This shows you riders in front of you and behind you.  You can see their name, nationality, estimated time from you, the watts/kg they are generating and how much distance they've racked up this session.

One of my first questions was, how do I steer?  Well, there is no steering component.  Your avatar will happily zip between riders and everyone will coexist nicely.  Though I noticed with my Kurt Kinetic R&R that I would lean into turns; it didn't have any in game effect but it made the simulation feel a lot more realistic.

Pausing is pretty easy, just stop riding.  As soon as you coast to a halt the pause screen comes up.  This will allow you to change various settings including things like screen resolution and the way your avatar looks.  Unlockables such as jerseys, bikes and wheels can be enabled here.

Right away you start to notice the other riders.  Some are blue and translucent while others are more solid looking, with kits on and different bikes.  The former are computer controlled riders (or bots) and the latter are real people.  On the right hand side of the screen you can see the names, nationality and power reading (in watts / kg) of a rider.  Everyone's name is in order of what order they are in front/behind you so the order does change often.

A few seconds later and I pass through the start gate of the lap.  A random selector begins flashing through icons until one lands.  Possible selections are:
  • Aero Boost.  Icon resembles an aero helmet with sunglasses.  Makes you more aero for 30 seconds.  I particularly like this one as it doesn't have any requirements.
  • Draft Boost.  Icon resembles a white van.  Reduces your drag reduction by 70% for 30 seconds.  Of course, you need to be drafting for it to work.
  • Lightweight.  Icon resembles a feather.  Lowers your weight by 8 lbs for 15 seconds.  I both like and dislike this particular bonus.  I like that it doesn't have any pre-requisites but I hate that its only 8 lbs.  I could be biased but I wish it was a percentage of weight instead of a static amount.
  • Large Bonus. Icon resembles a large + sign.  Gives you 250 points. (Yes, points covered later).
  • Small Bonus.  Icon resembles a small + sign.  Gives you 10 points.
  • Breakaway Burrito.  Icon resembles... a burrito!  Mmmmm burrito!  This particular power up seems to have been disabled; what it  was supposed to do was make you un-draftable for ten seconds.
So what's up with points?  Well, you get the points by riding or by getting the bonuses.  Riding 1 km nets you 20 points.  Eventually these points get you new levels, where new gear such as jerseys, bikes and wheels are unlocked.  To recap thus far; you are in a massive multiplayer online world, battling it out for points and gear... starting to sound a lot like World of Warcraft isn't it?

While I'm riding I notice a large animation on the screen that appears like two cyclists getting closer or further together, with a sign that says "CLOSE THE GAP".  I realize it's indicating for me to draft the player in front of me.  That's right, the game has drafting.  It doesn't seem to match real life drafting.  In real life, I am a quite the wheel-sucker.  But in game I can't seem to stay behind at a steady rate.

At certain places there are segments. Currently there are three; sprint, KOM and lap.  Sprints are fairly flat and short.  KOM's (aka King of the Mountain) are usually climbing based.  Last but not least, the lap is usually the entirety of the course.  Winning first place gets you a jersey; green, red polka-dot and orange respectively.


With the segments come a few more details.  Your display at the top of the screen expands with a few more details.  The most prominent on is your time and the slot you are competing for.  It also gives details on how far away the finish line is, your estimated time of arrival and your personal record time over the past 30 days.  An additional cell pops up on the left hand side of the screen -- it varies between the current standings of the segment and your personal attempts at the segment.

As I approach the first large incline, I notice my speed slow to a crawl.  I start to mash the pedals down to make more power, which ends up translating as a trickle of speed.  It kind of feels like climbing in Gatineau Park.... I'm going very slowly and straining very hard.  The main difference is gearing and cadence.  In the park, I'm in my climbing gears and trying very hard to keep at least 70 RPM.  In Zwift, I'm in faster gears, and my cadence is higher.  This is the experience from a non-smart trainer point of view.  I'm told on a smart trainer, the resistance can increase or decrease depending on the slope, which provides for a realistic experience.  That being said, from the sweat pouring off me, this feels plenty realistic!

With more game-play come more goodies.  There are achievements unlocked for power challenges, like sprinter apprentice for hitting 800 watts or Sprinter in Training for hitting 900 watts.  One particularly amusing achievement was called "Shut up Legs" for holding 500 watts for ten seconds.  Some are speed based, such as Speed Demon at 50 mph (most speed challenges I saw were for MPH even though I was set for metric).  Other achievements exist for distance challenges, like Marathoner for riding 40km at once.


Zwift Mobile Link
I would be remiss if I didn't talk about the Zwift Mobile Link.  This application is for iOS and Android.  If you aren't logged into Zwift it enables you to sneak a peek at who is riding.  If you are online, it becomes both a handy dashboard, action menu and display of other riders around you.

In the dashboard screen, the very top shows you the current boost available.  By pressing it, you can activate the boost.  The next few lines are details about your current session; your power in watts, your in-game speed, your in-game odometer, elevation climbed this session, your total session duration, current cadence and heart rate.  There is a button to run the lap in reverse as well as a button to stop.  I'm assuming it's pause but I haven't tried it yet.

Swiping the screen leads to another menu filled with mostly emoticons.  You can activate actions like waving or elbow flicking.  There is also a group message selection that allows you to speak in-game to other players.

A third screen can also be accessed showing you which players are nearby.

The only thing I didn't like about the app was the way it relayed chat messages.  They usually cover the top part of the screen.  More than once I've tried to press a boost near a finish line, only to press someone's message instead.  When you do this, the app assumes you want to write a message back and opens up a dialogue.  Trust me, you don't want to hear what I'd have to say after you just screwed up my boost on a sprint segment!!

What I like about Zwift
Looks like Zwift gets the job done!
First and foremost, I like the way Zwift makes a trainer interesting.  One of the most difficult things about using a trainer indoors all winter is to stave off boredom.  Zwift helps keep things fresh.

I also really enjoy the zPower aspect of Zwift.  I can see a good estimate of my power without having to fork out for a power meter.  A much bigger deal for those of us who don't have power meters.

The fact that Zwift is a social game appeals to me.  Or maybe it's the old adage of "Misery loves company."  Either way, I get to interact with a bunch of other bike nerds who are enslaved to a trainer inside.  Some nights there are hundreds of players in Zwift, all riding on the same course I am.  It definitely makes it feel a lot less lonely.

I like the way Zwift engages my competitive nature.  In addition to playing with many others, you will find people who end up being the same, or slightly faster, than your in-game speed.  I find that encourages you to try harder, to be far ahead of these other players, rather than sucking at their wheels.  I am a person that responds well to a rabbit in front of me.

The Strava integration is important to me.  I'm a data nerd and I like to see my stats, they help motivate me.  With Zwift and Strava I can easily monitor my progress.  With Strava feeding calorie counts to my food app, this means that my Zwift sessions will also automatically be taken into account.

It's free.  That's right, not even a penny out of my sporran!  Well, for a limited time anyway.  Free while they're in beta.  I get the feeling they are going to start charging this winter.  As long as their subscription fees are in line with Tour de Giro and TrainerRoad, I don't see that being a problem.


What Zwift Needs Prior to Going Gold:
"Going Gold" in video game parlance means the game is at a point where it is a "Gold Master", when publishers ship the game out to be sold.  In this case, I refer to the point where Zwift starts charging subscription fees (as opposed to the current free beta).

First up to bat is workouts.  Yes, it is really fun to ride around in Zwift.  But riding a trainer all winter is going to require some structured workouts.  Having real workouts is something worth paying a subscription fee for.  This is something the Zwift team says they are working on.

I'd list voice chat as a must-have.  Yes, there are better solutions out there already and they shouldn't develop a voice chat in-house.  But they could at least standardize on a system.  Chatting live is going to be a lot easier on a bicycle than the current system of typing on a keyboard.

Teams!  I want to easily identify others in my local club; I want to see their name highlighted or marked in some way, I want to proudly wear our kit while riding in Zwift.  I want to be able to use the aforementioned items in conjunction with this; I want to be able to do structured workouts in sync with my team; I want to be able to voice chat with just my team.


While the two current courses are great (Watopia and Richmond), I can't see myself paying a fee for just two courses.  If I had a number to choose from, it would make a subscription a no-brainer!

Bluetooth!  While I'm already set up for ANT+, I know lots of people who use Bluetooth sensors.  If you already have a Bluetooth speed/cadence sensor or power meter and a computer that supports Bluetooth, its really annoying to dish out additional funds to get an ANT+ stick and ANT+ sensors.  It would definitely make the subscription fee easier on the wallet for people in that situation.  Zwift has posted that they are currently developing Bluetooth connectivity.

Last but not least, a little more polish.  I should be able to enter promo codes or change my avatar without completely logging in.  I should be able to link Zwift to Strava from both the web site (where it is now) and the app.  Maybe a logout screen so I'm never left wondering, "Did it just crash or exit gracefully?"

Conclusion
Well, I've definitely been having fun with Zwift.  At the time of this writing I've clocked close to 200km and 1500m of elevation in-game.  So far it has become my go-to when I want to do an early morning fat burning session.  September/October rain in Eastern Canada is also pretty frigid so Zwift has become my main ride when the precipitation falls.  I'll be watching the development of this software closely.

Monday, 16 February 2015

Review: Trainer Road

A structured workout from Trainer Road.
Yellow is power, red is heart rate, white is cadence.
I decided to kick my indoor cycling up a notch and use Trainer Road.  It's cycling software designed for use on an indoor trainer.  It advertises 800+ structured workouts, 40+ workout plans and live feedback from your sensors.  I had followed along with others using Trainer Road and figured I'd give it a shot.  Since they offer a money-back guarantee for the first 30 days, trying it out was a risk-free endeavor.

Trainer Road supports sensor data from both Bluetooth and ANT+ and supports Windows, Mac OSX and iOS (iPhone / iPad) for platforms.  You can watch things like Netflix while it overlays the information on your screen or you can sync it to workout videos like the Sufferfest.  You can create your own custom workout.  The program supports teams and you can set your team to have access to its own private workout.  It works on a subscription based model where you pay $10 per month (lower rates for yearly of course).

Setup
I started setting up my Windows PC, which I thought would be a perfect fit for my configuration.  All my sensors are Bluetooth 4 and my laptop has native Bluetooth 4 support.  Unfortunately Trainer Road only supports a specific Bluetooth dongle and cannot make use of native Bluetooth 4 support on a PC.  While it's a cheap fix (the dongle costs $20) I was annoyed.  I also didn't feel like ordering a $20 dongle just to try out the software.

Most of my portable devices are Android based, which Trainer Road does not support.  Fortunately Goldilocks has an iOS device, an iPad mini, which I could steal liberate borrow for my workouts.  Trainer Road works just fine with native Bluetooth 4 on the iPad Mini.

Setting up the application was pretty painless.  It paired seamlessly with my Polar H7 heart rate monitor as well as my Wahoo Blue SC speed/cadence sensor.  


In most of the workouts there is instructional information, Sometimes it is giving specifics about the workout, like what your cadence should be or information on the next interval coming up.  It will also encourage you to do things like go in the drops (or use your aerobars if you have them).  One of the things I really like is the comments on form -- tips on relaxing your upper body to conserve energy and how you should be positioned on the saddle.

The other cool thing about this software is Virtual Power.  In order to see your power output you normally would require a power meter.  But power meters are pretty expensive.  Trainer Road can emulate one if it knows what kind of trainer you have.  Using the power curve information from your trainer and your speed, it can estimate what your power is.  My trainer was in the list; it also took into account what my resistance was set to.

How It Works
The actual work out consists of a profile coloured in blue.  Your sensors generate several lines representing power (yellow), heart rate (red) and cadence (white).  The data is also in numerical format on top of the screen.  The general idea is you are trying to keep the yellow line outside of the blue profile; it's also represented numerically as "Target Power".

The 8 Minute Test
To get started, you want to find out your Functional Threshold Power.  Trainer Road provides a couple of tests to do this, the 20 minute test and the 8 minute test.  I can't really speak about the 20 minute test as I've never tried it, so I'll stick to the 8 minute test.

The test consists of a warm up with 2 fast spinning efforts to get your legs going.  After some easy spinning there is an 8 minute effort, followed by 8 minutes of easy spinning, then another 8 minute effort, then more easy spinning and you are done.

The idea behind the 2 8 minute efforts is to go hard but stay consistent.  You need to hold yourself back enough to last the entire 8 minute interval, but you don't want to feel like there is "gas left in the tank" so to speak.  You want it to be a pretty steady effort, not jumping all over like crazy.  Don't worry about having enough strength left to do the second interval, the recovery period in between will leave you refreshed enough to tackle the second one.

Upon completion the software will calculate your FTP based on both efforts.  With this number it will set each workout with your power numbers in mind.  Each time you do better on this test, the software will push you harder on subsequent workouts.

Problems with Virtual Power
I was looking forward to training with power instead of heart rate.  Heart rate takes up to 2 minutes to respond to your effort, whereas power is instantaneous.  Fatigue and other factors play a role in your heart rate, whereas power is always the same.  Of course, there are things heart rate is better for.  It helps keep your intensity in check, making sure you don't push yourself beyond your limits.  Fortunately Trainer Road also keeps track of your heart rate so you can have your cake and eat it too.

To beat the boredom of working on a trainer, I indoor cycle in a group with others.  Many of us were using Trainer Road so we sync'd our start together and performed the 8 minute test.  At the end we started talking about the results we had.  When I gave my number there was a lot of jaw dropping, eyes widening and people saying, "That can't be right."  My virtual power numbers were reading like a pro athlete.

I got in touch with Trainer Road Support to see what the problem was.  We went back and forth in email many times, each time with different ways to make sure my trainer was set up correctly.  We did everything from ensuring every setting was correct, to making sure the wheel was solidly connected to the trainer, even silly things like making sure I had only one magnet.  I took pictures and sent video of my configuration.  Eventually we did track down a problem with my tube; my tests after that were lower but still too high.

After three weeks of emailing back and forth and several 8 minute tests later, we'd pretty much gone through everything we could and my virtual power was still extremely high.  They gave me a free month due to the length of time I ate up doing everything.  I thanked them for their help and released them from assisting further.  After all, they had been thorough.  They couldn't have made any money off me either, from the amount of time support spent on my problem.

So in the meantime, if I want accurate power numbers I'll have to keep pining for a power meter.  I would love to get access to one briefly, just so I can see how the numbers compare.

Final thoughts
Despite my problems with virtual power, I would definitely recommend it.  Even if those numbers are wrong; as long as they are consistently wrong I will still progress with my workouts.  From the experience I also know that support will try very hard to help when things go wrong.

This is me with my old coach.
Trainer Road put her out of a job.
At least for the winter. :D
That being said, I wouldn't recommend Trainer Road if you are looking for a cheap replacement for a power meter.  I would recommend it as a great software to really push you and get results.

As for me, I plan on keeping my subscription going until it's warm enough to ride outside.  I'm happy with the progress.  If the numbers were closer I'd probably keep the subscription going all year.

Thursday, 1 January 2015

Indoor Cycling Part 1 Complete

For a while I was posting weekly updates for the indoor cycling.  It was pretty dry, boring stuff focusing on the detail of the intervals.  I wanted to record those details anyway; I ended up recording it in Strava instead of gumming up my blog with boring posts.  Instead I'll post more occasionally about it, but with more relevant (and less boring) material.

After nine weeks we've completed the first part of our two-part indoor class.  I figured it would be a good time to look back at the nine weeks and see what I've managed to accomplish thus far.

I've noticed an increase with my functional threshold power.  We did our first test on the very first day and we did a follow up about seven weeks later.  The second test showed an improvement of 8%.  It doesn't seem like a lot, but keep in mind I'm basing my FTP on my heart rate; this means I can hold a heart rate that is 8% higher for an entire hour.  That's very significant!

My pedaling technique and cadence have greatly improved.  I figured I was pretty good at the start of the class, easily able to fall into a rate of 90-95 rpm.  Since then I've been improving my technique by trying to "kick" forward on the top of a stroke and scrape my foot at the bottom.  With this technique I've managed 125+ rpm cadence in a very controlled manner.

My leg muscles have come a long way as well.  My calf muscles were already pretty large at the start of class.  They've gotten bigger and more well defined.  My quads are definitely the larger increase though; my upper legs went from flabby to extremely muscular. My time spent posing in the mirror has basically tripled, yay for vanity!

I've gotten much better at standing up while riding.  I used to have terrible stamina and get exhausted right away.  Now I can maintain it very well.  My technique is improved here as well; I used to just pedal mash while standing but now I apply my newly learned pedaling technique.  I've also been working hard at my standing form so it is much easier to perform.

Riding in the drops of my handlebars used to be very tough.  One big factor is size of my gut; going into the drops meant kneeing myself in the stomach a lot.  Not to mention the position was just plain uncomfortable and I felt like it was harder to breathe. But over time my gut got smaller and my endurance grew.  Now I am much more comfortable leaning down and getting closer to my bike.  It doesn't help much in the indoor class but it's going to do wonders for me come spring.

My overall comfort and confidence with my clipless pedals and shoes has increased a lot.  To be fair, I'm on a trainer and there's very little chance of something going wrong, like falling over while my shoes are locked in.  But I've gotten very used to  being able to hop on or off the bike quickly.  When I go to stick my leg out, decoupling from the pedals is second nature.

Most importantly, it has been an exercise I've been able to maintain.  In the nine week period I've only missed a day or two.  Even when I had pneumonia and I was hacking up a lung, I was there on my bike.  Diabetes doesn't take a sick day so I felt like I couldn't either.

So, long story short, I'm really happy with my results.  I'm looking forward to what the next nine weeks will bring!


Monday, 1 December 2014

Indoor Cycling Week 4

Due to scheduled plans I wasn't able to attend the first 2 days of indoor cycling class.  That's just the way life goes sometimes.

I was determined to go on the third day.  I don't want to miss a whole week.  Even with a nagging cough and lingering migraine, I was still hell bent on going.  I took what I could to deal with the migraine and just hoped that coughing wouldn't be an issue.

The class was doing more over-under intervals.  As this is the third class of the week, the duration is an hour and a half.  After warming up and getting up to speed, we did 130% FTP 1 min, easy spin 1 min, repeat 10 times.  Then second set was similar, only we did 150% FTP.  The last set was also similar but the lowest amount of effort, 120% of FTP.

The bad part was I felt my smart phone at home.  Since my smart phone is the brains of my sensors, I basically lost any sort of read out.  No speed, cadence, heart rate, etc..  So I had to guess what my FTP was.

The good part was everything else turned out great.  I did still cough a bit, but almost always when I was easy spinning.  The head pain had dissipated when we had arrived.  During a particularly hard effort when my legs were burning and my lungs were on fire, I found myself smiling, really enjoying the intensity and burn.  What can I say, it's addictive!

Monday, 24 November 2014

Indoor Cycling Week 3

Day 1
Today was the day to bring on the pain.  The intervals we were performing were called High Intensity Interval Training, or HIIT.  With this sort of training, we are performing a "microburst" of activity followed by a very short recovery.

After the usual warm up and ramp up to get our heart rate going, we dived into these intervals.  They were only 15 seconds each at 150% of our Functional Threshold Power (FTP value calculated at first class).  After each we'd easy spin for 15 seconds.  Repeat this sixteen times for a set, then perform the set 3 times (with cool down in between).

I had a rough estimate of my FTP based on my heart rate.  The problem here is, how do you get to 150% of your FTP in only 15 seconds?  It takes a little while for your heart to fire up like that!  So instead I just threw every intensity I had at it.  I started standing up to pedal for every other peak, in order to make it even more difficult.

Day 2
 This was another new interval called a Sprint-erval.  First, a warm up with a bit of sprinting in it.  For a set you had to do 200% of your FTP for 15 seconds, then easy spin for 45 seconds.  This is repeated 3 times.  Finally, a sustained effort of 4 minutes for 90% of your FTP.  This set was performed five times.

Its very hard to get that heart rate up in 15 seconds.  I put everything on with the most resistance, stand on the pedals and power down as hard as I can.  I managed to stand for every sprint session.

Day 3
Unfortunately I got off to a bad start.  I was almost at class when I realized I had forgotten my phone.  All my sensors rely on my phone; without it I have no idea of my heart rate or cadence.  These have gotten very important in class.  I had to head back, get my phone and head to class again.  It made me 15 minutes late but I arrived in the midst of the first interval.

Today was a day I will refer to as Sprints and Sprint-ervals.

The first set of intervals consisted of a hard (200%FTP) effort for 15 seconds followed by a 45 second recovery.  Then a sustained effort of 4 minutes.  This was repeated three times.  At the end of the third set there was also a 30 second sprint effort.  For the sprints I was standing up to pedal and I did the sustained effort from the drop position.

The second set of intervals were hard sprints.  You start at 200% FTP for 15 seconds, easy spin for 15 seconds,   Repeat sixteen times for a set.  We did that set three times.  I didn't bother standing for any of these sprints; there was so much shifting I felt more comfortable with my hands on the brake hoods.  My chain managed to drop twice doing these.

Sunday, 16 November 2014

Indoor Cycling Week 2

Day 1 (1 hour)
Tuesday's class consisted of some new intervals.  It started off similar to the others we've done; five minutes warmup, 70% effort for a minute, minute easy, 80% minute, minute easy, 90% minute, minute easy.  After that we went full-out effort for 30 seconds and easy spinning for 30 seconds, repeated 20 times for the set.  Then five minutes easy spinning and a repeat of the 20 intervals, finishing with a 5 minute cool down.

I noticed my wooden block slipping again.  I slowly (but firmly) tried to rotate my front tire with my hand, as though to pull the block under the tire more.  Instead of the block moving, my entire bike rolled forward.  Which again was fine, because I was centered on the block.  Unfortunately, my wife wasn't so lucky.  Her blocks few out from under her front tire with a clatter.  But like a trooper she just kept on spinning.

Day 2 (1 hour)
I wanted to put an end to the slippery antics so I went shopping.  I picked up two CyclOps Riser Blocks.  Unlike other blocks, they have three different levels.  Apparently both blocks can be combined to simulate many climbing positions.  I also picked up some cushioned interlocking mats.  The mats would help with the slippery sweat mess in addition to providing some dampening of vibrations.

Today's class started with an 80% effort to warm up, then we went right into Individual Leg Training, or ILT's.  In a nutshell, you start pedaling with one foot then switch to another.  While pedalling you concentrate on how to make circles with your pedal stroke. It sounds easy enough, but I actually found it pretty difficult.  I had my bike set for little resistance and was using an easy gear, but found my heart rate up while doing the ILTs.

The last intervals were interesting.  Each set was nine minutes.  The first 2 minutes were at 80% effort and the third minute was at 100%.  Then minutes four and five were at 80%, then minute six at 100%.  Then minutes seven and eight at 80% and finally the ninth minute at 100%.  We did this three times with a 5 minute cool down in between.

Day 3 (1.5 hours)
Last Saturday I was low on liquids so I thought I'd be better prepared this time.  In addition to my Polar 24oz water bottles, I also brought along a bottle of Powerade.  My bike doesn't have three bottle holders though.  I used a small bungee cord to fasten it to a sane spot on the front of my bike.

For this class we did more over-unders.  First a warm up to bring us to our Functional Threshold Power (FTP).  After a five minute cool down, three minutes were 90% of FTP, then 2 minutes 105% FTP, another 3 at 90% and another 2 at 105%.  That's ten minutes of cycling like a madman.  We did that particular set five times, with five minutes of cool down in between.


Monday, 10 November 2014

Cycling Indoor Edition Part 4

After an awesome party and return ride home, I only got a few hours sleep.  My wife was going to be working throughout the day and wouldn't be joining me for this class.  I felt like my determination to go was wavering.  My wife pointed out how much trouble I went to in order to attend..  It was subtle but effective prodding as I ended up heading to the two-wheeled torture chamber.

The Bike Thong!
I picked up a Minoura Safe - T - Net Sweat Net.  The amount that I sweat is nothing short of epic.  All that sweat is basically salty water and not good for my frame.  The sweat guard stretches from the handlebars to the seat post, creating a terrycloth towel-like barrier.  I like to jokingly call it my "bike thong."

Today's session was longer, 90 minutes instead of the usual 60.  It would be more intervals of varying effort with 1-3 minutes of easy spinning between each.  We started with a five minute warm up and started our first set.  It had 3 intervals; 70% effort for 5 minutes, 80% effort for 4 minutes and 90% effort for 3 minutes.  This set would be performed a second time.  Then a set with 3 intervals of 3 minutes duration.  The last two sets were the same 3 intervals; 70% effort for 3 minutes, 80% effort for 4 minutes and 90% effort for five minutes.  Then a five minute cool down.

The resistance changes I made fixed my problem.  I felt like I was getting the right amount of resistance.  I was able to stand up during intervals where it was called for and was able to keep pedalling along.

This class I ended up rationing my water carefully.  The last two classes I had brought sufficient water but this class would be harder and longer.  I made a mental note to bring either an extra bottle or an energy drink to the next long class.

The hardest part of the session was the cool down.  I kid you not.  Normally I'm all smiles and enjoying the endorphin buzz on cool down.  This time it was agony.  For some reason spinning with no resistance was leaving me with a permanent grimace.  It seemed like the longest five minutes of my life.

So far I've really enjoyed the class.  The work outs have me drenched in sweat and I'm already looking forward to seeing how it affects my performance in the spring.  There are three classes per week and I'm positive I can make a minimum of two, if not all three.  Between this, Project SubZero and the core exercises I've been planning, I should have a very active winter!

Saturday, 8 November 2014

Cycling Indoor Edition Part 3

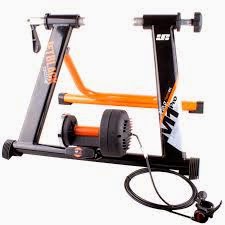
Jet Black M1 Trainer with Tacx Trainer Tyre.
Our second day we had Tacx Trainer Tyres outfitted on our rear wheels.  The concept is they're made specifically for use with a trainer, so they'll last longer than a normal tire.  And of course, since you're not using your actual road tire, it's getting no wear at all.  The tires are smurf blue, guaranteeing you'll never confuse them with a normal road tire.

Through the fitness test we discovered what sort of sustained effort we could keep.  I think the term for it is "Functional Threshold Power."  Today we'd be making use of that information for our efforts.  I used a heart rate monitor to keep track of my efforts but the instructor also gave instructions for people with power meters and speed/cadence sensors.

The instructor dubbed the class "Throwback Thursday" with all music being from the 80's and 90's.  The format was similar to yesterday's class only the intervals were shorter and more frequent.  There were a few screens displaying this information with a series of graphic displays and timers,  The instructor would also call out any changes so you didn't need to keep an eye on them.

Looking around I noticed new faces and rides.  Lots of road bikes and more triathlon bikes.  It seemed like aero-bars were extremely popular.  From what I heard, this would be happening all month as people retired their rides for the winter.

At one point we were instructed to stand while pedalling.  I got up to pedal and found I couldn't.  I felt like there was no resistance there.  I ensured that I was in my hardest gear and my trainer's resistance was on the highest setting.  I looked over to my wife and noticed she had a similar problem.We ended up just sitting through the rest of the standing segments.  I tried to make up for it by greatly increasing my effort through cadence.

We discussed the problem with the instructor afterwards and got some tips on how to fix it.  After making some adjustments, I noticed there was a lot more resistance.  I don't think it was pressed up against the tire enough.  I checked the manual later that evening and it confirmed my suspicions.

Next up, the finale aka Part 4!

Thursday, 6 November 2014

Cycling Indoor Edition Part 2

A window-less basement room with lots of bikes set up on trainers.
A window-less basement room filled with metal monstrosities
whose sole purpose is to cause pain and agony.
In medieval times it was called a torture chamber;
today it is called the spinning room.
On my first day I had a look around at other riders and bicycles.  It seemed like the majority of the bikes were time trial or triathlon bikes.  A few road bikes and I spotted one hybrid.  All the pedals that I saw were clip-less pedals.

Once we got started we did some light spinning while introducing ourselves.  After that the instructor gave us an outline of what we would be doing.  We would be doing a fitness test where we had to hold a certain amount of effort for two eight minute intervals, with a few minutes of easy spinning in between.  He explained that it was important not to go all-out; you don't want to just run yourself to exhaustion right away.  You want to go at your highest sustained effort that still allows you to accomplish the intervals.  And of course, there would be a warm up prior and a cool down after.

Well, it ended up being quite a workout.  I was sweating like crazy, even with help of three fans.  A puddle of sweat pooled below my bike.  I am so glad I brought two towels!  The only thing that was odd was my speed was pretty high.  I feel like there might be an issue with the resistance being too mild.

Picture of my wife's bike and my bike.  Both are Norco Valences but hers is a smaller women's version.
The Wife's Valence (left) and my Valence (right).
The style of trainer we had uses the rear tire, which elevates the tire.  Most people put something under their front tire to level things out.  I had grabbed one of the "freebie" wooden blocks from the front of the class.  At first it was working out well.  But my uber-sweating had created a pool of disgusting-ness beneath me which made the block a little slippery.  It ended out sliding from under me.  Fortunately I could feel it happening and made the transition as gently as possible.  I then made sure to put on my "I meant to do that!" face.  Might be a sign to start looking for a good riser block that won't slide.

I had heard one of the down sides of indoor cycling was the monotony of it.  You don't have the breeze in your hair or beautiful scenery to look at.  I found doing intervals really helped with this.  When you change things up every few minutes, the time just flies.

More coming up in Part 3!


Tuesday, 4 November 2014

Cycling Indoor Edition Part 1

I had my last ride outdoors with the Valence.  The temperature was about 6C and the wind was southeast at about 20km/h.  I made the mistake of forgetting about the wind and rocketed along with it.  I ended up fighting a mean head wind all the way back.  Despite the rough ride back, I made sure to enjoy every minute of it.

One of my winter strategies was to take up cycling indoors.  I have a recumbent stationary bike that I can ride.  The upside is its free, the downside is I can't ride with my wife and it doesn't do much for my cycling form.  There are spin classes where they supply stationary bikes; I can ride with my wife but again it doesn't do much with cycling form.  I'm also worried that relying on either will mean getting used to my saddle all over again in the spring.

So instead we opted for an indoor cycling class being held by my local bike shop.  This class didn't supply equipment; you need to bring in your real bike and a turbo trainer.  These trainers basically convert your real bike into a stationary one.

My trainer, a JetBlack M1 turbo trainer.
We were able to obtain two Jet Black M1 magnetic trainers. A remote attached to your handlebars allows you to control the magnetic resistance.  The trainer holds onto the rear of the bike and presses up against the rear tire for resistance.

The indoor cycling room is a large basement room that is well ventilated with several fans.  We set ourselves up at the front of the class, near one of the larger fans.  I'm not normally a front-of-the-class kind of guy but I wanted to make sure not to miss anything.

Stay tuned for part 2 where we get right into the action!